


Weathering the Storm
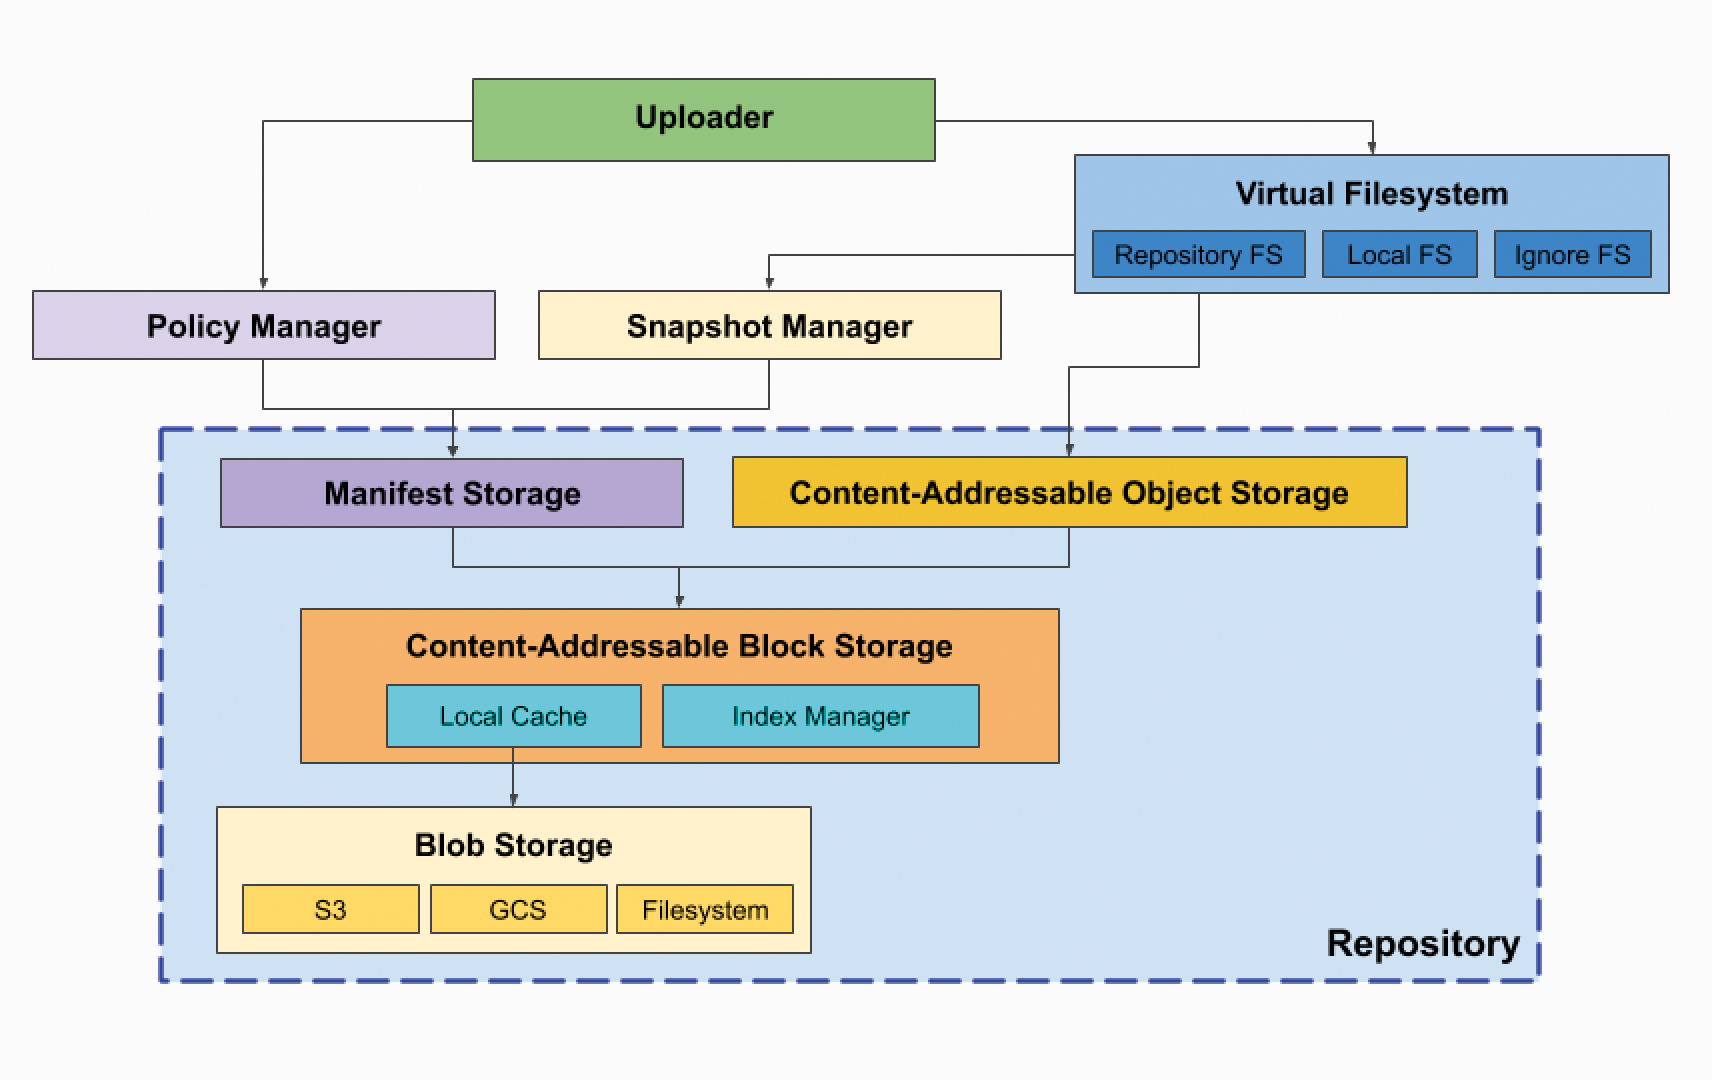
Providers of cloud-based security systems often implement procedures on the server side to tighten vendor lock-in and prevent canceled subscriptions. Kopia [1] avoids this problem by implementing the backup system's intelligence on the client side (Figure 1). Before I look at this structure in detail, let me just mention that Kopia uses a rolling hash in the background (i.e., a hash function that processes files sector by sector [3]).
Layers Manage Storage
The lowest hierarchical element in the Kopia architecture is blob storage, which is responsible for storing the raw data. Kopia currently supports a dozen or more different implementations [4]. One level above is the storage manager, also known as content-addressable block storage, which generates the hash functions mentioned earlier and is responsible for modularizing and encrypting the data records managed by Kopia.
Because this level is primarily optimized for managing blocks of around 20MB, another level, known as content-addressable object storage, in combination with metadata management, lets you store more or less arbitrary objects in blob storage, concluding the description of the internal architecture of the file storage locations known as repositories.
Outside the blue box in Figure 1 is the client-side logic that takes care of information management. Communication between the repository and the client is encrypted. According to the Kopia development team, the password used to encrypt the data transfer never leaves the client and cannot be found by attackers in the repository.
Getting Started on Windows
One Kopia version has a graphical interface, with another edition optimized for command-line operation. The two versions are differentiated by name: Kopia is the command-line version of the backup tool, and the graphical version I am using on Windows is named KopiaUI. Note that GUI versions for macOS and Linux are also available. In the following discussion, I use "Kopia" as a synonym for both versions. For this article, I first configure a Windows 10 virtual machine (VM) to illustrate the use of the GUI.
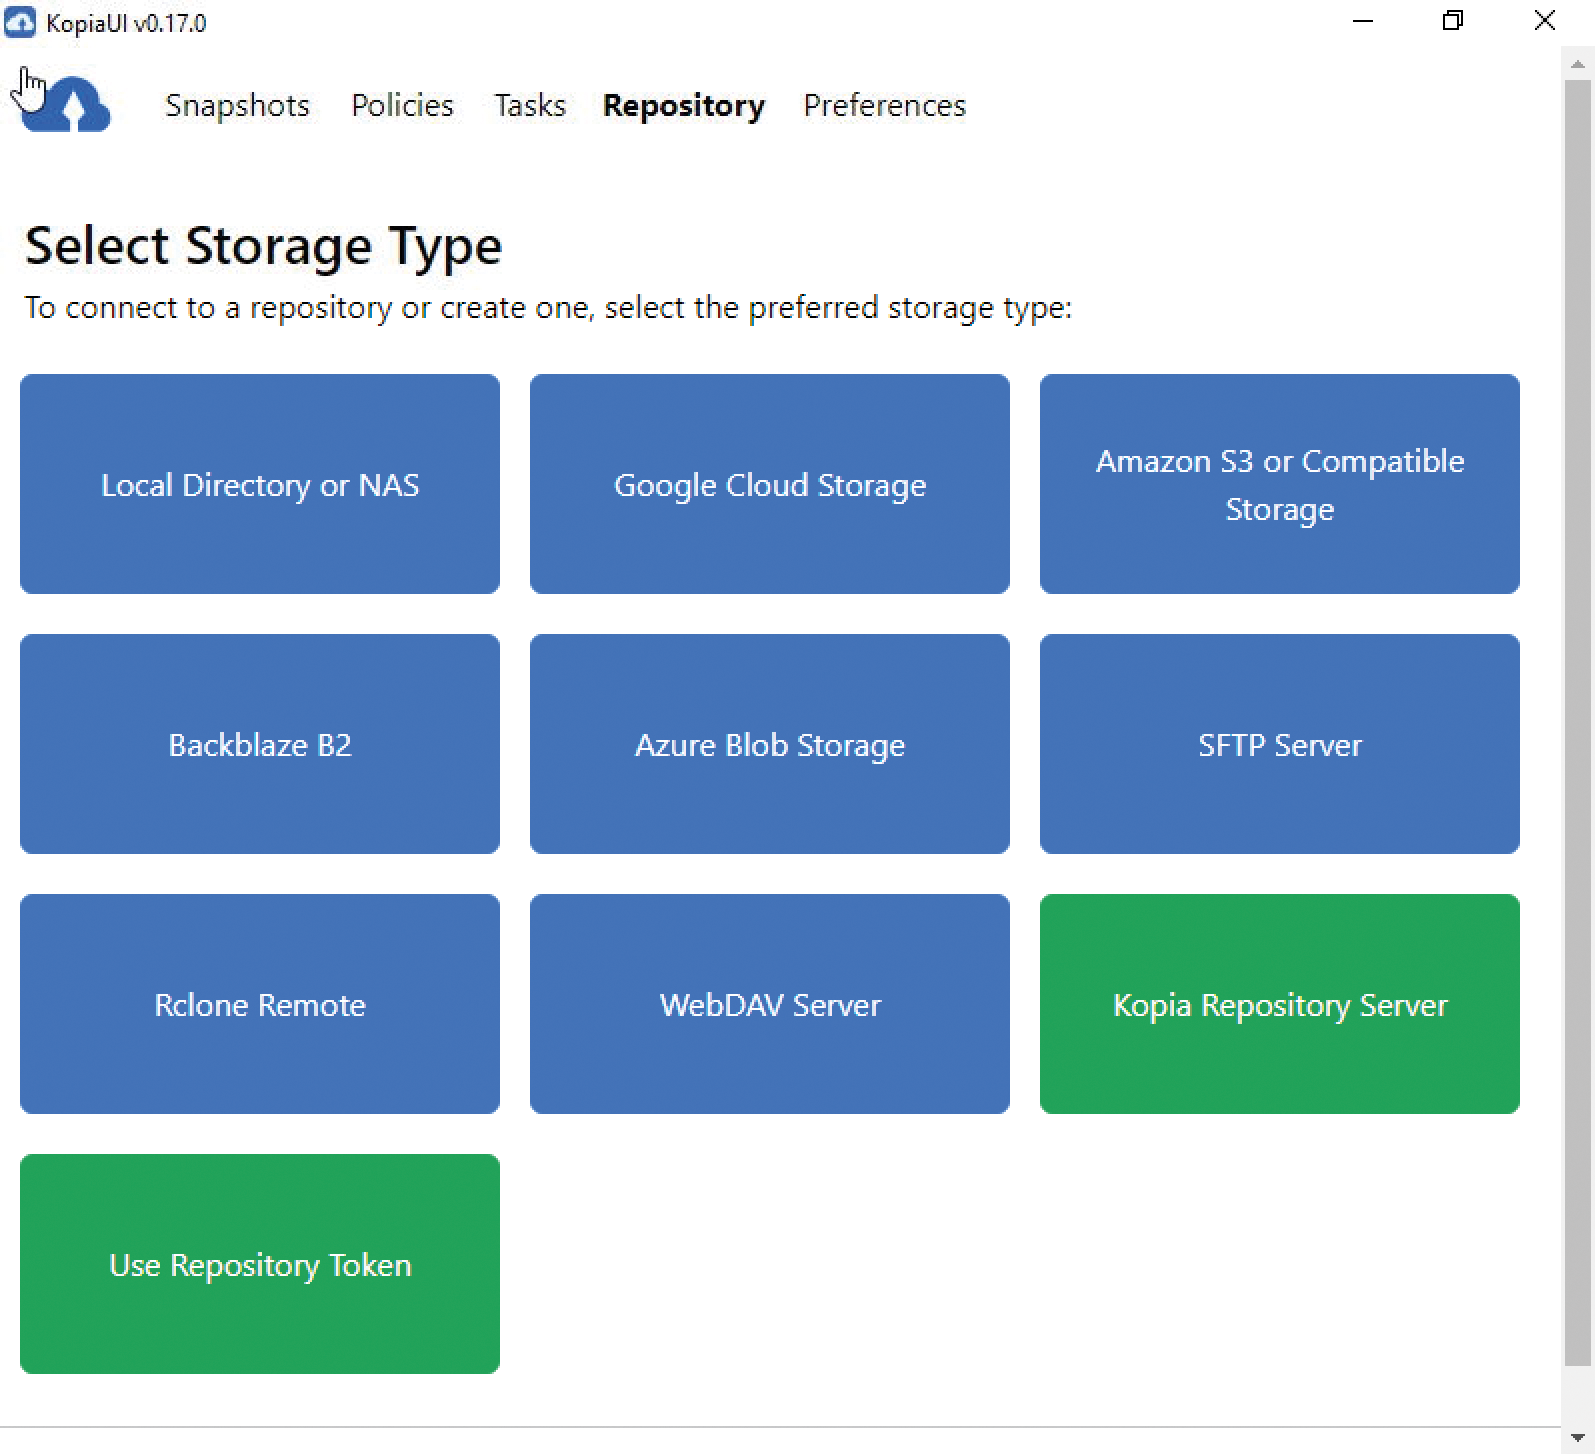
The binary file you need is on GitHub [5]. The release current when I was writing this article was version 0.17.0, and the file required for the GUI version of the workshop was KopiaUI-Setup-0.17.0.exe. After completing the install, the program starts its daemon in the taskbar and switches to the repository configuration dialog (Figure 2), which is logical in that you need a storage location before you can create backup flows.
Installed with the default settings, Kopia does not start automatically when your computer reboots. To solve this problem, simply click on the Kopia icon in the start bar and select the Launch At Startup option. After a restart, the Kopia application should run; if not, maybe your scheduling policies, which I look at in a moment, are not working.
I will be working with Azure Blob Storage in the following steps. The Kopia interface is currently not capable of provisioning resources in the cloud, which is why I need to open the Azure portal (https://portal.azure.com) so I can create Azure cloud resources with a GUI.
After completing the login, you will find the Storage Accounts | Create option in the Favorites section of the menu to initiate the process of creating a new storage account. In the case of Azure, blob storage means a customized version of a generic storage account. In other words, if you want to create blob storage, the first step is to add a storage account to the Azure subscription, which then handles the blob storage.
Microsoft prompts you for information about what you intend to do with the storage account to be created. It is particularly important to select the option Azure Blob Storage in the Primary Service field and Backup and Archive for Primary Workload. Note that the wizard automatically selects a comparatively expensive redundancy level, but in this case, you can just restrict LRS mirroring to the bare minimum and go for the cheapest operating mode. Next, select Option Review and Create. It is important to check the Public Endpoint (all Networks) box under Network Connectivity in the Network section of the summary. If the wizard chooses a different option, the Azure firewall will block Kopia from accessing the resources.
After clicking Create, some time passes while the Azure back end provisions the resources. Clicking on the dialog that appears after selecting the Go to Resource button opens the properties of the storage account in which the credentials required for the connection with Kopia are available. Now use Data Storage | Containers to create a blob container, which first shows you a list of containers in your storage account. Next, select Plus Container to create a new container. It is important to assign a name that complies with the naming guidelines provided by Microsoft for Azure resources. The following steps use itatestbox. It is also important that Authentication method: Access key appears in the header once the configuration is complete. Use of the new Entra function was not supported when this article went to press.
The next step is to obtain your access keys by switching from the properties of the blob storage you just created to the general properties of the storage account. When you get there, you will find the credentials that let Kopia interact with the cloud resources in Security & Networking | Access Keys. Now transfer the credentials to the Kopia storage configuration window. The Azure Storage Domain field can remain empty if the end of the connection string looks something like . . .==;EndpointSuffix=core.windows.net.
After clicking the Next button, Kopia checks the login data you entered; if the connection attempt is successful, the system then switches to the box where you can enter a password. This step is important because it is where you enter the password that the backup system uses to encrypt the backup copies stored in the repositories. If this password is lost, all of your backup copies are unusable.
Advanced settings can be configured from Show Advanced Options; for example, you can define which cryptographic resources to use. After applying these settings, the repository is activated, which Kopia acknowledges by displaying a table that is currently empty and would normally list the various snapshots contained in the repository.
Setting Up a Backup
After establishing a relationship between Kopia and the repository instance intended as the storage location for the files to be saved, you need to define the operations (policy) to be carried out for the data backup. Much like an insurance policy, a policy in Kopia is a backup guideline that defines the information to be saved and the interval for updating the information available in the repository.
To use Kopia realistically, I back up a database. The most convenient way of doing this is to download an arbitrary repository from GitHub. In the following steps, I use the source code [6] of the FreeRTOS real-time operating system by way of an example. The option of downloading a ZIP archive by pressing the green Code button generally does not lead to usable repositories because it does not download linked code. In this case, however, it is fine for extracting the (non-compilable) content of the ZIP file into the filesystem of the VM. Here, the data ends up in the C:\FreeRTOS-Kernel-main directory.
The next step involves a special feature of the user interface: You will find an input field for selecting a directory. When you create a policy, you need to select the folder to which the attributes defined in that policy will apply.
Clicking on the blue Select Folder icon opens a dialog where you can now choose the folder with the FreeRTOS source code. Press Set Policy to open a window with several tabs in which you define the policy properties. The most important of these is Scheduling, which is where you define when the copies on the server are updated. The easiest way to do this is to use the Times of Day box. The system then uses the times entered there (when active) to update the backup copies.
Note that the dialog is split into two parts. When you create a new policy, Kopia takes the default settings from a global policy, which saves many a mouse click in the user interface for more complex configurations. The Manual Snapshots Only box, if enabled (yes), has Kopia ignore all scheduled or cron-based backup jobs without so much as a by-your-leave.
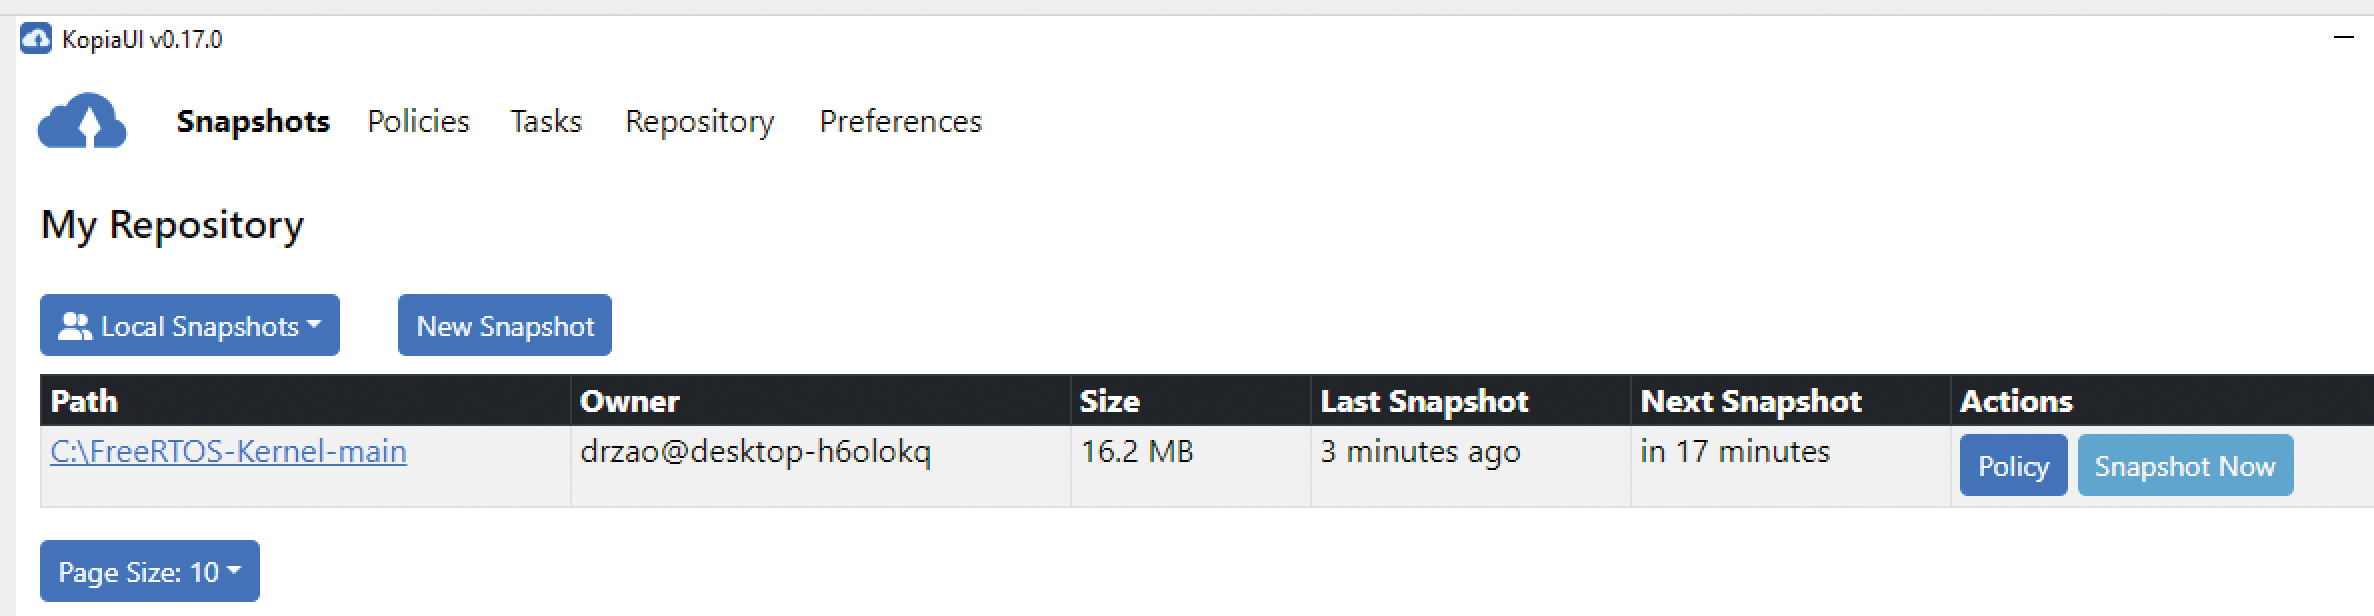
Alternatively, you can click on the Defined by this policy checkbox next to the Snapshot Frequency section, which takes you to a dialog (a 30-minute backup interval is used in this example). Kopia tells you in the Upcoming Snapshots section when the next updates will take place. Once the work is done, click Set Policy; you will now find two rules in the policy list. After the interval has elapsed, a backup is created (Figure 3). You will also find the latest actions performed by the backup software in a table on the Tasks tab.
Restoring Backups
Uploading the FreeRTOS source code to the server is only half the battle, of course. By definition, backup programs are only genuinely useful if you can restore the information. In Kopia's case, the first step is to open the link in the Path column of the Snapshots view, which will take you to another table listing the various snapshots. Clicking on one of these snapshots brings up an administration window.
Use the Mount as Local Filesystem option to tell Kopia to mount the contents of the backup as a local drive. Alternatively, you can use Restore Files & Directories to trigger a normal restore of the backed up files.
Controlling Kopia at the Command Line
Finally, I'll look at the non-graphical version, which you configure from the command-line interface (CLI). I use a VM running Ubuntu version 24.04 LTS as the host. The commands discussed here cover only a small part of the functional scope of the Kopia CLI. A complete description can be found online [7].
On freshly configured systems, the first step is to download curl,
sudo apt install curlthen execute two other commands in a root shell:
curl -s https://kopia.io/signing-key | sudo gpg --dearmor -o /etc/apt/keyrings/kopia-keyring.gpg
echo "deb [signed-by=/etc/apt/keyrings/kopia-keyring.gpg] http://packages.kopia.io/ apt/stable main" | sudo tee /etc/apt/sources.list.d/kopia.list
The first command loads a PGP key that lets the package manager verify the correctness of the data in the repository. The second command integrates this key and the repository into the package sources.
To download Kopia, enter:
sudo apt update
sudo apt install kopia
The VM installs the current version of the backup software. For the GUI, the next step is to register a repository. The kopia repository snap-in is generally used. Because of the different requirements of the storage providers, the parameters for the command depend on the back end; more information can be found online [4]. The next step is to create another repository:
kopia repository create azure --container=itatestbox --storage-account=tamsitatestacct --storage-key=arIf this repository has already been parameterized, the command-line client responds with the message ERROR unable to get repository storage: found existing data in storage location. The connect command, which connects to a repository that has already been set up, will soon sort out this problem:
kopia repository connect azure --container=itatestboxThe command expects the three parameters that you are already familiar with from the create command. The password for encryption is entered from a standard command line; once the work has been completed, the command confirms that the connection is working by outputting a Connected to repository status message.
In the next step, enter
kopia snap-shot list --allto display a list of the repository contents onscreen. The IDs that identify individual backup copies are of particular importance. To display the details of the snapshot, you need to create a mountpoint and connect it to the data:
mkdir /tmp/freertos
kopia mount <ID of the security copy> /tmp/freertos &
The & character at the end instructs the shell to execute and repeat the command, so Kopia permanently maintains the connection. An ls command then shows that the FreeRTOS source code is now also available in the Ubuntu VM.
Conclusions
Kopia works with numerous back ends and offers advanced configuration options. It encrypts the backups and lets you store them in the cloud or on remote sites. The backup snapshots also lend themselves to flexible handling, and you can choose which files to restore from them. In addition to the features mentioned here, the software also offers data compression and deduplication. All told, Kopia is a flexible backup tool that, even at its very young age, proves to be a useful alternative to commercial systems.
[2] Kopia architecture: https://kopia.io/docs/advanced/architecture/
[3] Rolling hash: https://en.wikipedia.org/wiki/Rolling_hash
[4] Repositories for Kopia: https://kopia.io/docs/repositories/
[5] Kopia binary file: https://github.com/kopia/kopia/releases/
[6] FreeRTOS: https://github.com/FreeRTOS/FreeRTOS-Kernel
[7] Kopia command-line commands: https://kopia.io/docs/reference/command-line/