
For many years, network-attached storage (NAS) meant buying an appliance from vendors such as Synology, QNAP, or NetApp, inserting a number of disks and accepting whatever operating system and feature set the manufacturer provided. That model works well, particularly when simplicity and vendor support are more important than flexibility. But there is another approach: Take standard server hardware, combine it with a storage-focused operating system, and retain control over the hardware, filesystem and upgrade process.
TrueNAS Community Edition is one of the best-known open source systems built around that idea. It turns an x86 server into a network storage appliance with a web-based administration interface, OpenZFS storage, SMB and NFS file sharing, iSCSI block storage, snapshots, replication, applications, and virtualization.
The project has gone through several naming changes. For many years, the FreeBSD-based version was known as FreeNAS and later TrueNAS Core. A second Linux-based product called TrueNAS Scale was introduced afterwards. In 2025, iXsystems, the company behind the development of TrueNAS, simplified the product line: Scale became TrueNAS Community Edition, while development of the older Core branch wound down. The remaining TrueNAS Community Edition as well as the paid Enterprise edition releases are exclusively Linux-based.
At the heart of TrueNAS is OpenZFS, which combines filesystem and volume-management functionality in a single system. It provides features such as end-to-end checksumming, copy-on-write updates, snapshots, compression, replication, and configurable redundancy, helping detect data corruption, preserve previous versions efficiently, and recover from disk failures when sufficient redundancy is available.
In this article, I will install TrueNAS Community Edition, create a storage pool and datasets, configure SMB and NFS shares, examine ZFS snapshots and replication, look at applications and virtualization, and discuss the hardware and operational decisions to make when running TrueNAS in production, at home, or within the company network.
| Name: | TrueNAS Community Edition |
|---|---|
| URL: | https://www.truenas.com/truenas-community-edition-features/ |
| License: | Open core, with open source components including LGPLv3 and GPLv3 parts |
| Documentation: | https://www.truenas.com/docs/ |
| Based on: | Linux and OpenZFS |
| Current Stable Release: | TrueNAS 25.10.7 “Goldeye,” September 2026 |
| Latest Early Release Line: | TrueNAS 26 Beta |
| Commercial Version: | TrueNAS Enterprise |
Table 1: TrueNAS Community Edition project information.
Choosing the Hardware
TrueNAS as such has pretty modest minimum hardware requirements, but since storage systems are used by all users on a particular network, high performance will make a huge difference for them. The official minimum requirements for current TrueNAS installations are an x86-64 processor, 8GB of RAM, a dedicated boot device, and at least two storage devices for creating a redundant storage pool. In practice, the correct hardware depends much more on the intended workload than on whether TrueNAS itself can boot.
A small home or office system might look like this:
| Resource | Size |
|---|---|
| CPU | 4-core x86-64 processor |
| Memory | 16 or 32GB ECC RAM |
| Boot device | 120GB SSD |
| Storage | 4×8TB SATA HDD |
| Network | 1 or 2.5Gbit/s Ethernet |
A larger system might instead have 8 or 12 disks, 64 or 128GB of memory, redundant power supplies, 10 or 25Gbit/s networking and dedicated SSDs for application or virtual-machine storage.
The first hardware decision should be the disk controller. TrueNAS works best when ZFS can see the individual physical disks directly. Traditional hardware RAID controllers hide those disks behind their own abstraction and should generally be avoided. If a host bus adapter (HBA) is used, it should operate in an initiator-target (IT) mode that exposes each disk directly to the operating system.
Do not create a RAID array in a controller and then put ZFS on top of it. Doing so prevents ZFS from knowing which physical disk contains which data and removes several of the properties that make ZFS attractive in the first place.
Memory is also important because ZFS aggressively uses available RAM as its Adaptive Replacement Cache (ARC). Seeing a TrueNAS system apparently use most of its RAM does not mean that it has a memory leak. ZFS gives memory back when applications need it. ECC RAM is desirable for a storage system because it detects and corrects memory errors, although TrueNAS does not require it. If the choice is between running no backups on an expensive ECC system and having proper backups on a reasonably built non-ECC system, the backups are still far more important.
Finally, use a proper SSD as the TrueNAS boot device. Installing onto a USB stick was common with old FreeNAS installations, but modern TrueNAS performs enough writes that USB flash drives are a poor choice.
Installing TrueNAS
TrueNAS is distributed as a bootable ISO image. Download the current stable Community Edition image from the TrueNAS website and write it to a USB drive. On Linux or macOS, identify the USB device and write the ISO with a tool such as dd:
sudo dd if=TrueNAS.iso of=/dev/diskX bs=4M status=progress
The exact device name differs between operating systems. Double-check it before running the command because writing to the wrong disk will destroy its contents.
Boot the storage server from the installer USB drive and select the option to install TrueNAS. The installer asks which device should contain the operating system. Select the dedicated boot SSD, not one of the disks intended for storing data.
After installation, remove the installer USB drive and reboot.
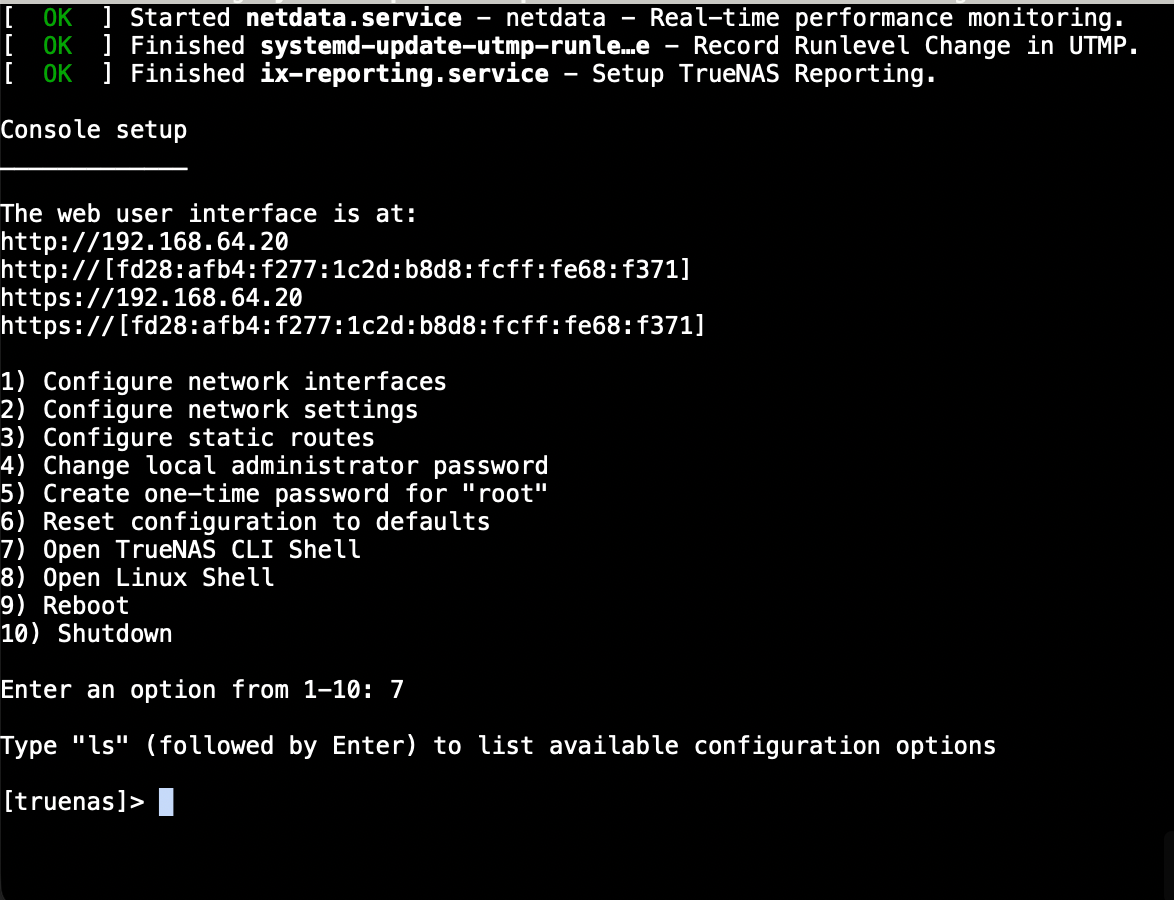
TrueNAS initially obtains an IP address using DHCP. The console displays that address after boot (see Figure 1 for an example). Open the address in a browser and log in with the administrative account created during installation.
The first thing to do is give the server a predictable network identity. In most environments, this means either creating a DHCP reservation for the TrueNAS network interface or configuring a static address. This is not strictly necessary if DHCP and DNS are integrated so that DNS records are updated reliably whenever the address changes, but a stable IP address simplifies operation and avoids problems with clients, firewall rules, NFS or iSCSI configurations, and other systems that may refer to the NAS by its IP address.
Understanding ZFS Pools and vdevs
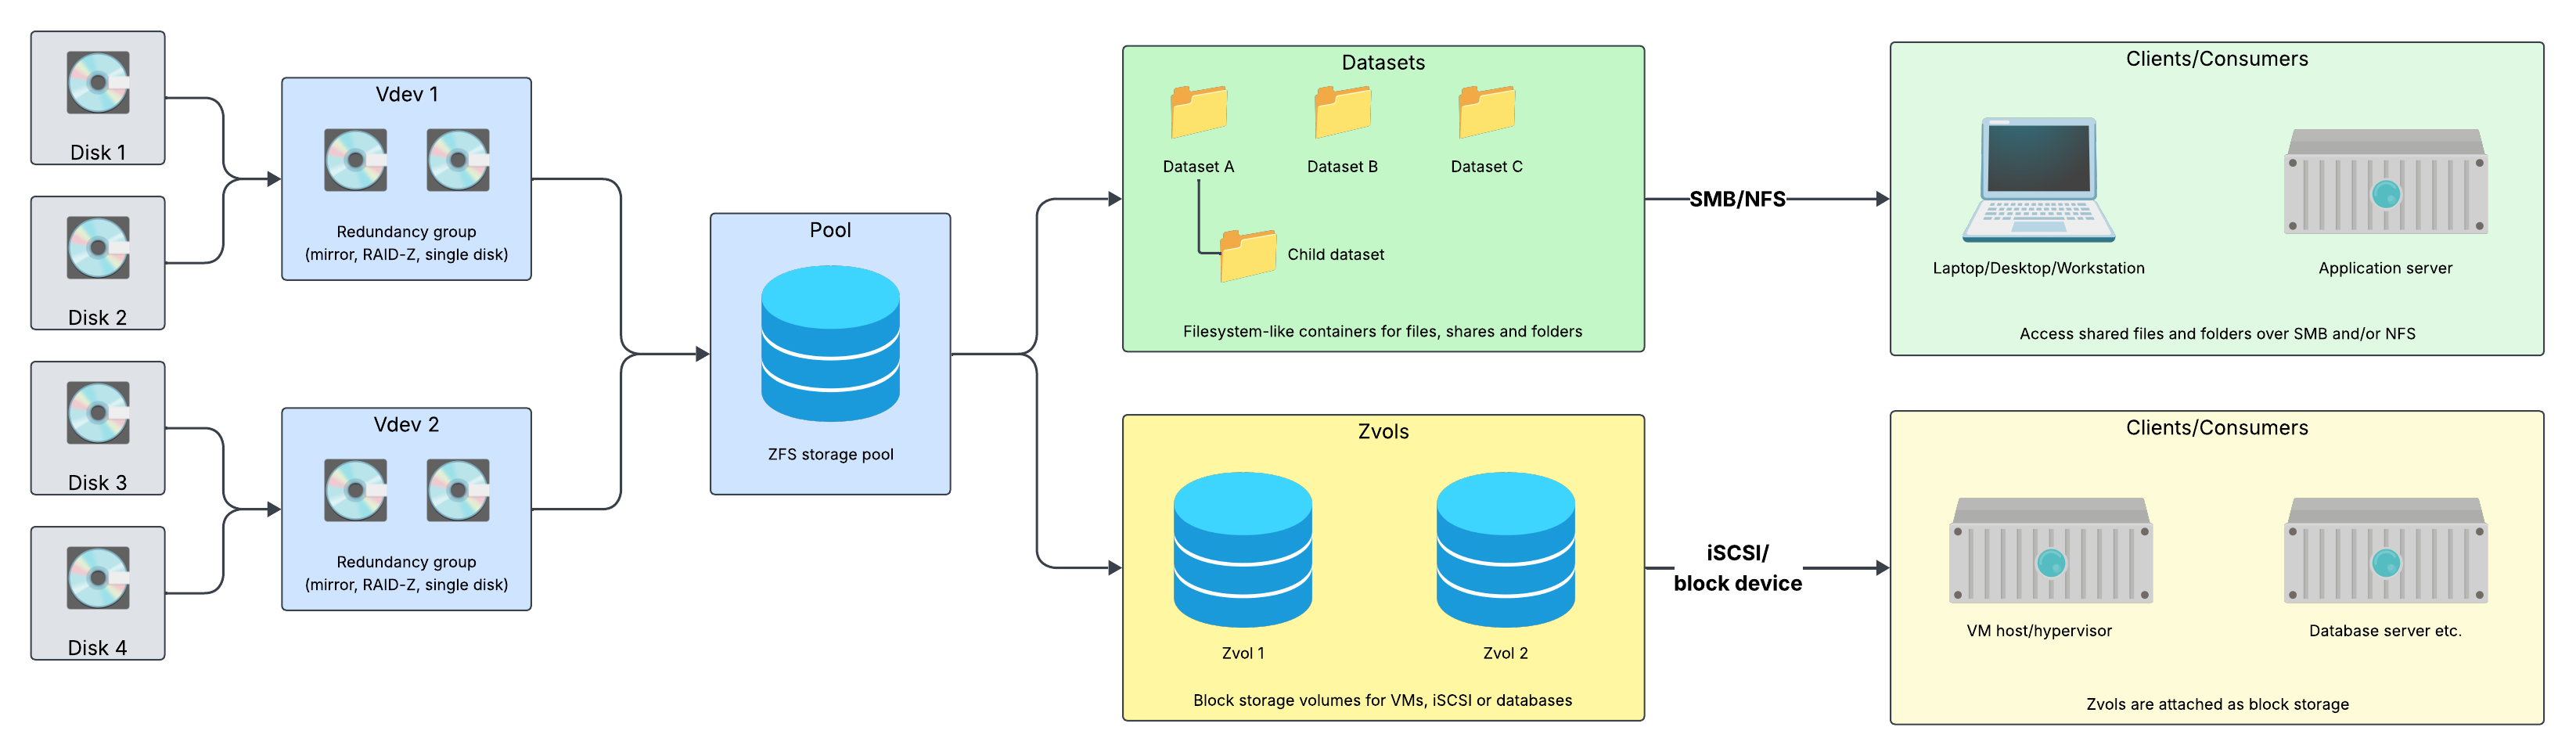
Before clicking through the pool creation wizard, it is worth understanding how ZFS organizes disks. The top-level storage object is a pool. A pool consists of one or more virtual devices (vdevs). Each vdev consists of one or more physical disks (Figure 2).
A simple four-disk system could use a RAIDZ1 vdev:
pool1
└── RAIDZ1 vdev
    ├── disk1
    ├── disk2
    ├── disk3
    └── disk4
One disk's worth of capacity is used for parity, and the system can survive the failure of one disk.
With RAIDZ2:
pool1
└── RAIDZ2 vdev
    ├── disk1
    ├── disk2
    ├── disk3
    └── disk4
two disks' worth of capacity is used for parity, allowing two disks to fail.
Another option is mirrors:
pool1
├── mirror
│   ├── disk1
│   └── disk2
└── mirror
    ├── disk3
    └── disk4
This resembles RAID10 and offers good random I/O performance as well as relatively straightforward expansion.
The important concept is that redundancy exists inside a vdev. If an entire vdev is lost, the whole pool is lost. Adding another mirror vdev to a pool is straightforward. Historically, adding individual disks to an existing RAIDZ vdev was much more complicated, although newer OpenZFS releases have introduced RAIDZ expansion capabilities. Even with newer functionality, planning the pool layout before putting large quantities of data onto the system remains good practice.
For general-purpose storage, RAIDZ2 is a good choice when six or more disks are available because it tolerates two simultaneous disk failures. Mirrors are often preferable for virtual machines (VMs), databases, and other workloads where random I/O performance matters more than maximum usable capacity.
Avoid choosing RAIDZ1 simply because it provides the largest capacity. Rebuilding a large multi-terabyte disk can take many hours, during which the remaining disks are under significant load, increasing the chances of a second failure during that process and destroying the whole pool.
Creating the First Storage Pool
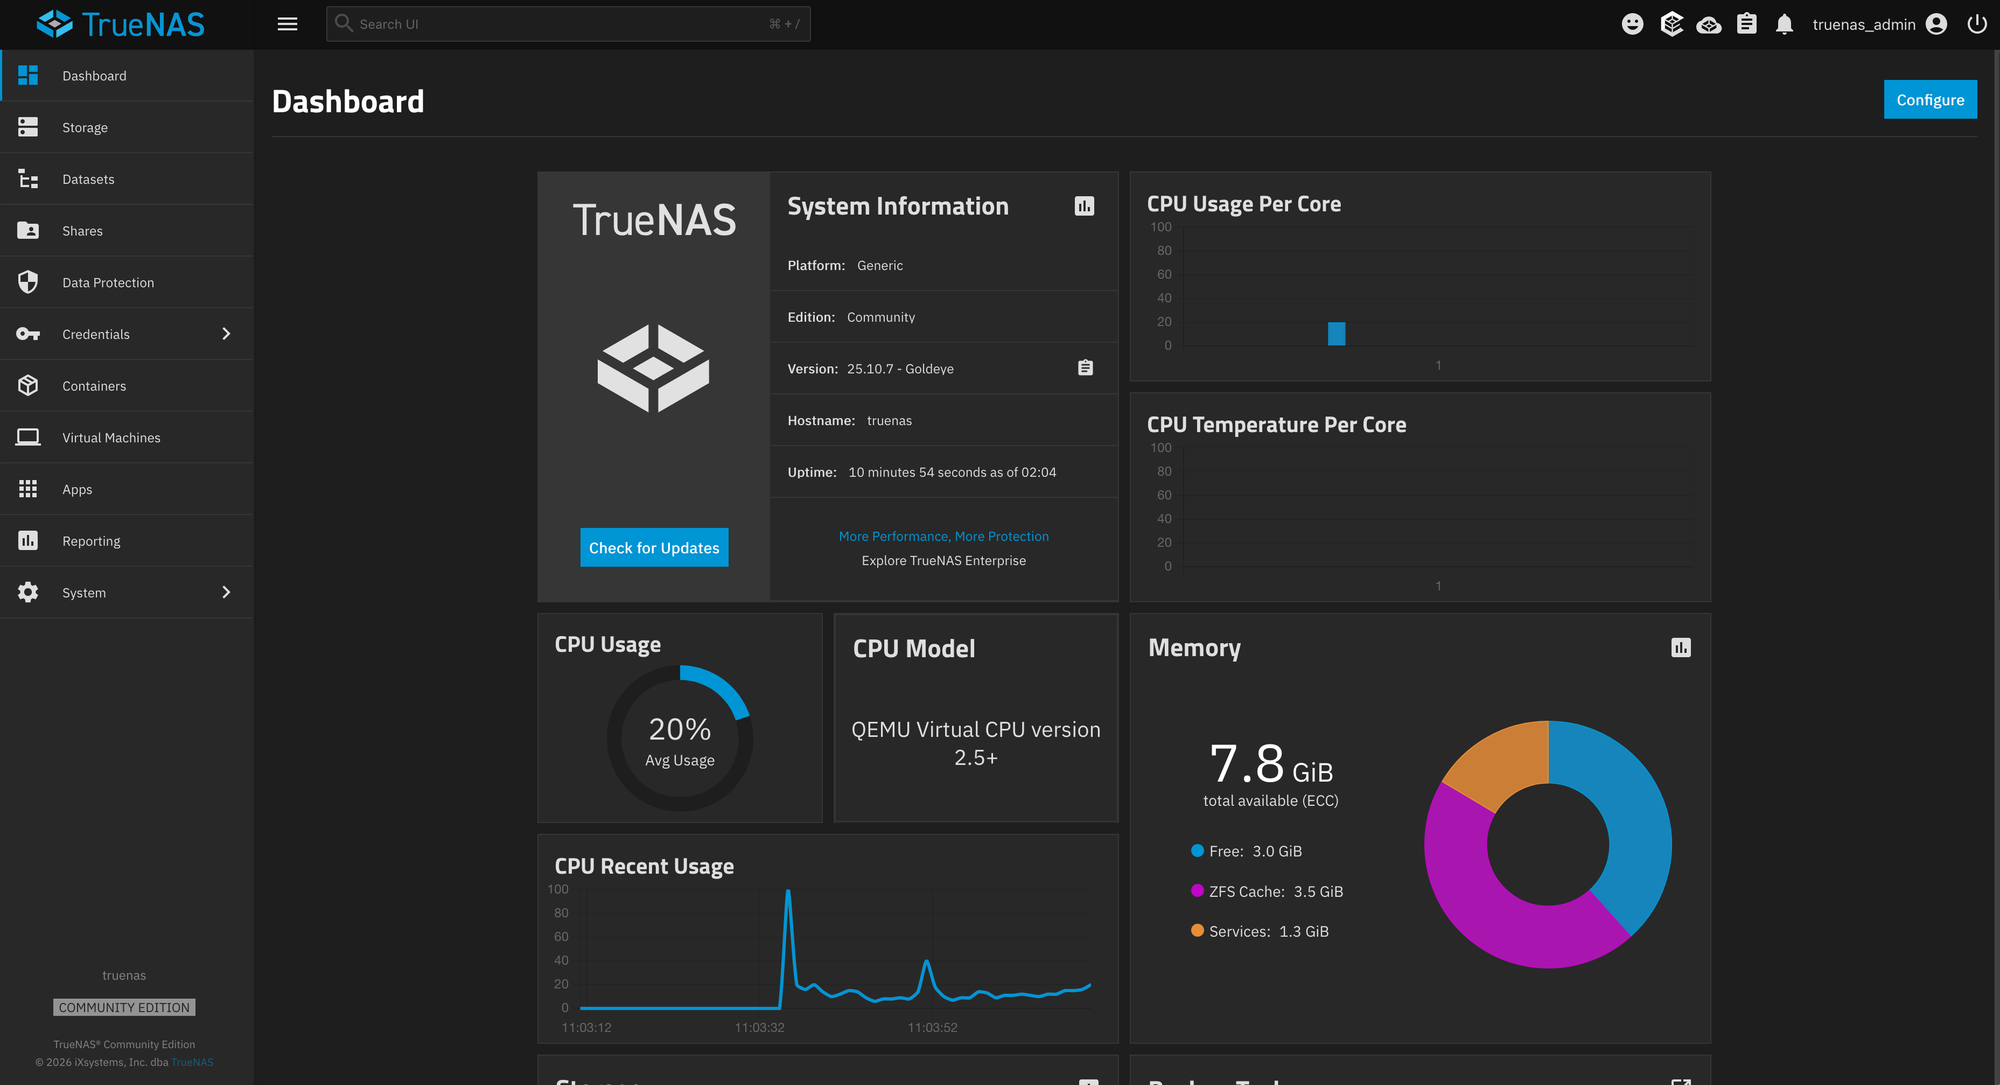
Open Storage in the TrueNAS web interface (Figure 3) and click Create Pool. Name it (e.g., "tank") and click Next. Assuming your server contains four identical 8TB drives, select those drives and create a RAIDZ2 data vdev.
The resulting raw capacity is approximately 32TB, but RAIDZ2 uses the equivalent of two disks for parity so net capacity is around 16TB. Filesystem overhead and the difference between decimal and binary capacity further reduce the usable space.
Do not plan to fill a ZFS pool to 100 percent. Performance generally degrades as the pool becomes very full. For a production system, treat approximately 80 percent utilization as the point where additional capacity planning should begin rather than as a target to exceed.
After creation, the pool appears under Storage. At this point it is tempting to create one large share directly at /mnt/tank. Do not do this. The pool root should normally not be the thing you expose to clients. Instead, divide the pool into datasets as outlined in the next section.
Organizing Data with Datasets
A ZFS dataset behaves somewhat like a directory, but it has its own filesystem properties. For example, create:
tank
├── documents
├── backups
├── media
├── users
└── vm
Each dataset can have independent settings for compression, quotas, snapshots, permissions, and replication. For example:
tank/documents: Snapshot every hour, retain snapshots 30 daystank/backups: Snapshot once per day, retain snapshots 14 daystank/media: Snapshot once per day, retain snapshots 7 daystank/vm: Snapshot every 15 minutes, replicate to second TrueNAS system
Datasets also allow different share types to use different ACL and case-sensitivity settings. TrueNAS provides presets for SMB, generic Unix data, multiprotocol use, and application data. When creating an SMB dataset, selecting the SMB preset gives it settings that are suitable for Windows ACL semantics. For an NFS-only Unix dataset, the generic or multiprotocol presets might make more sense. Choose these settings before filling the dataset with data. Some properties, particularly case sensitivity, are difficult or impossible to change afterwards.
Creating an SMB Share
SMB is the normal choice when files need to be accessed from Windows, macOS, and mixed desktop environments. First create a dataset documents by clicking on Datasets in the left navigation of the web UI, typing its name in the text field, and choosing the SMB dataset preset. Leave the checkbox Create SMB Share selected so that you don't have to create the SMB share later.
Next, create a user under Credentials | Users. Set a password and give that user or an appropriate group permission to the dataset. TrueNAS asks whether the SMB service should be started if it is not already running. Enable it and configure it to start automatically. You can later navigate to Shares to start, stop, and configure the SMB service manually.
Given your TrueNAS device is available under the DNS name truenas, you access the share from Windows using:
\\truenas\documents
On macOS, open Finder, click Go | Connect to Server, enter the following address, and click Connect:
smb://truenas/documents
From a Linux client:
smbclient //truenas/documents -U my_user
Or mount it using CIFS:
sudo mount -t cifs //truenas/documents /mnt/documents \
    -o username=my_user
Permissions are one of the areas where NAS systems can become complicated. Decide early whether permissions are controlled through local TrueNAS users, local groups, or a directory service such as Active Directory. Avoid individually granting 10 people permission to 10 different datasets. Create groups such as finance, engineering, and management, and assign permissions to those groups. This becomes much easier to maintain when employees join, move teams, or leave the organization.
NFS Shares
For Linux and Unix systems, NFS is often more appropriate than SMB.
Create another dataset linux-data, and then navigate to Shares | Unix Shares (NFS) and export /mnt/tank/linux-data. On a Linux client, the available exports can be inspected with:
showmount -e truenas
Mount the share:
sudo mount -t nfs truenas:/mnt/tank/linux-data /mnt/data
Unlike SMB, NFS traditionally relies heavily on numerical user and group IDs. If UID 1000 owns a file on the TrueNAS server but UID 1000 represents a different person on a client machine, permissions become confusing very quickly. For anything beyond a handful of machines, central identity management is preferable.
NFS is particularly useful for Linux servers, virtualization platforms, and Kubernetes workloads, although using a NAS as storage for databases or latency-sensitive applications deserves careful performance testing.
TrueNAS also supports iSCSI when clients need block storage instead of a filesystem share. With iSCSI, the remote system sees a block device and puts its own filesystem on it. This is useful for hypervisors and certain clustered applications but introduces a different operational model. Do not mount the same ordinary iSCSI LUN read/write from several unrelated machines unless the filesystem itself supports clustered access.
ZFS Snapshots
Snapshots are one of the strongest reasons to use ZFS. A snapshot records the state of a dataset at a particular moment. Because ZFS is copy-on-write, creating the snapshot does not require copying all data immediately. Initially, the snapshot consumes very little additional space. As live data changes, old blocks referenced by the snapshot must remain available.
Suppose a user accidentally deletes documents/contracts/2026/customer-a.pdf. If hourly snapshots exist, the file can be recovered from an earlier snapshot without restoring the entire NAS from backup. In TrueNAS, create a periodic snapshot task under Data Protection (Figure 4).
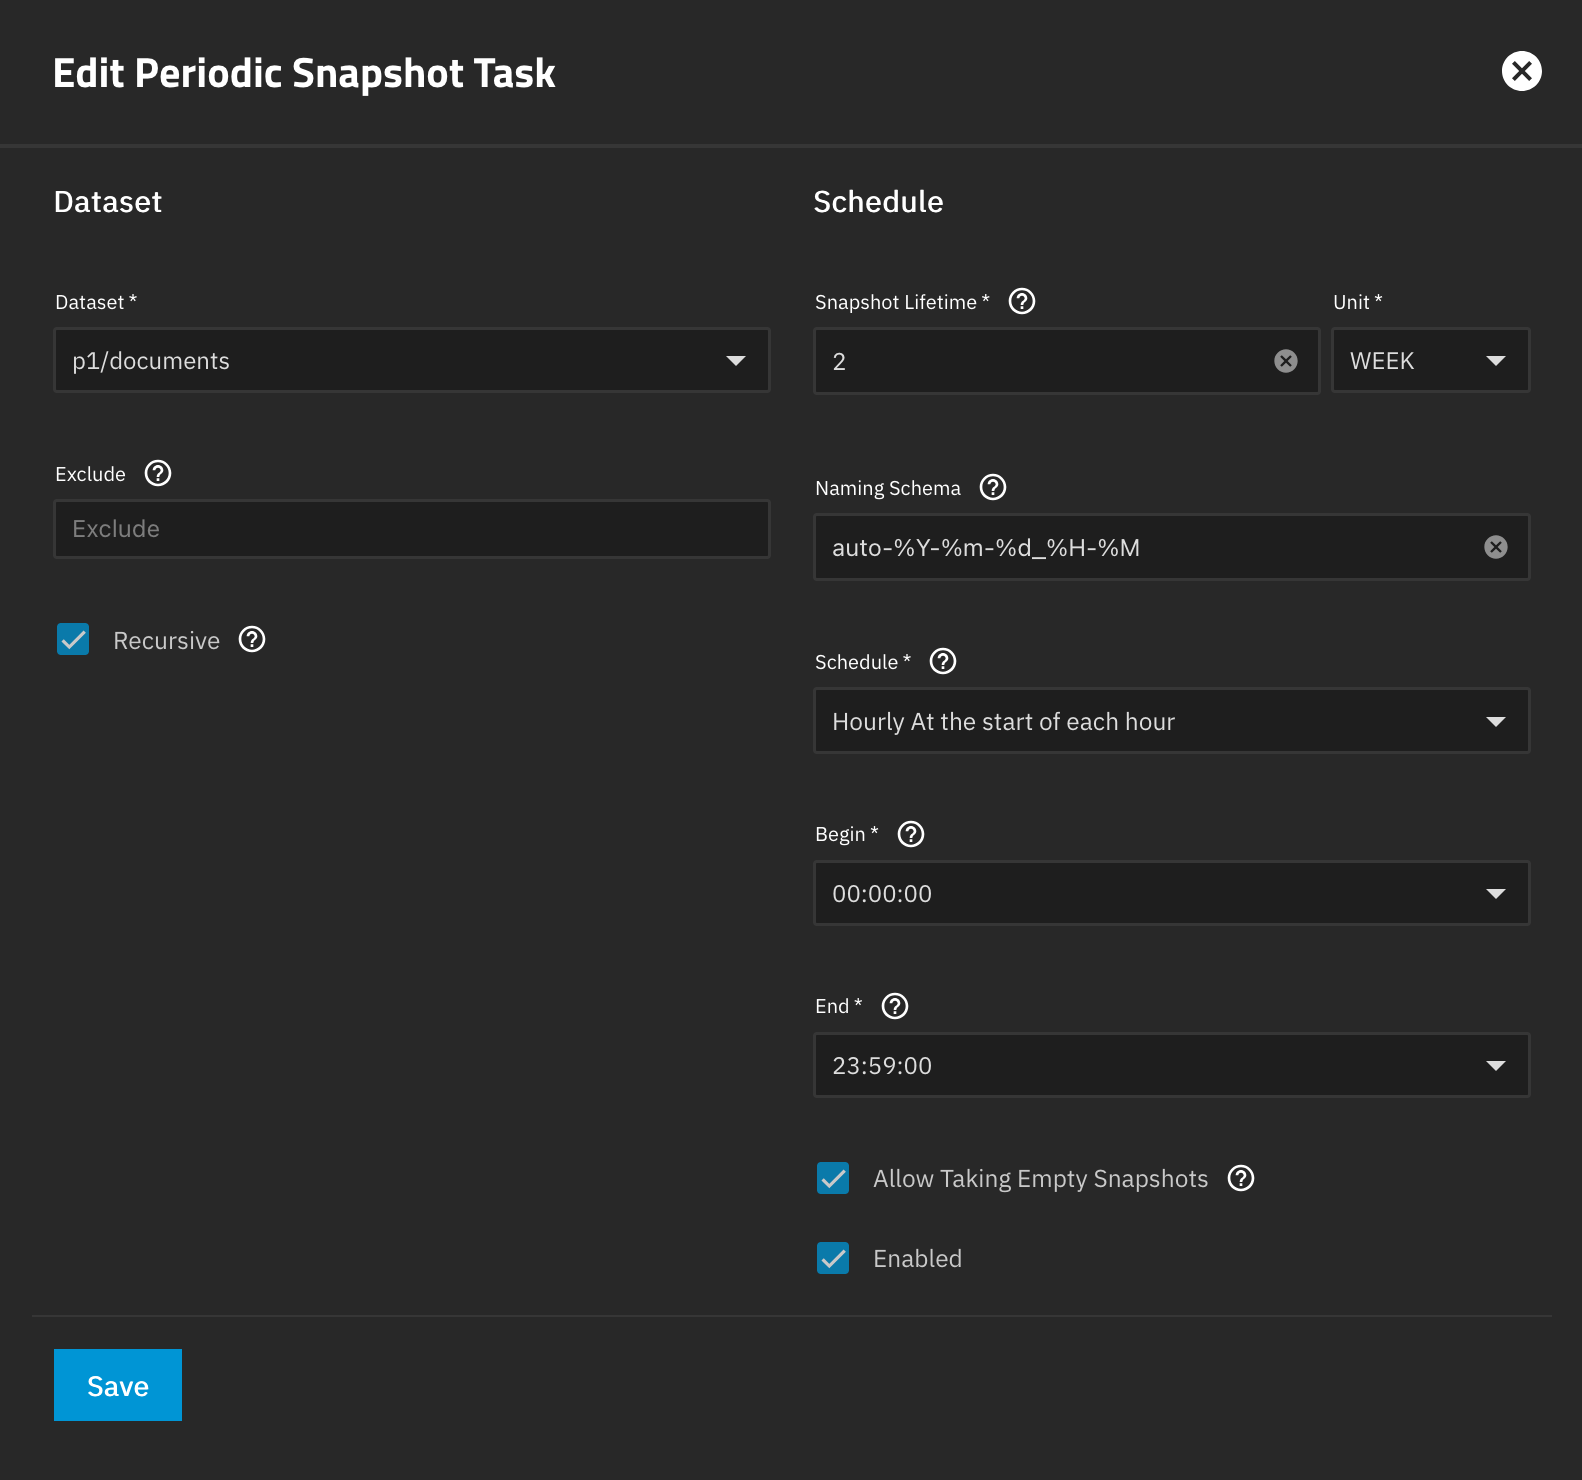
For example:
| Type | Value |
|---|---|
| Dataset | tank/documents |
| Schedule | Hourly |
| Snapshot lifetime | 2 weeks |
Then add a daily schedule with longer retention:
| Type | Value |
|---|---|
| Dataset | tank/documents |
| Schedule | Daily |
| Snapshot lifetime | 6 months |
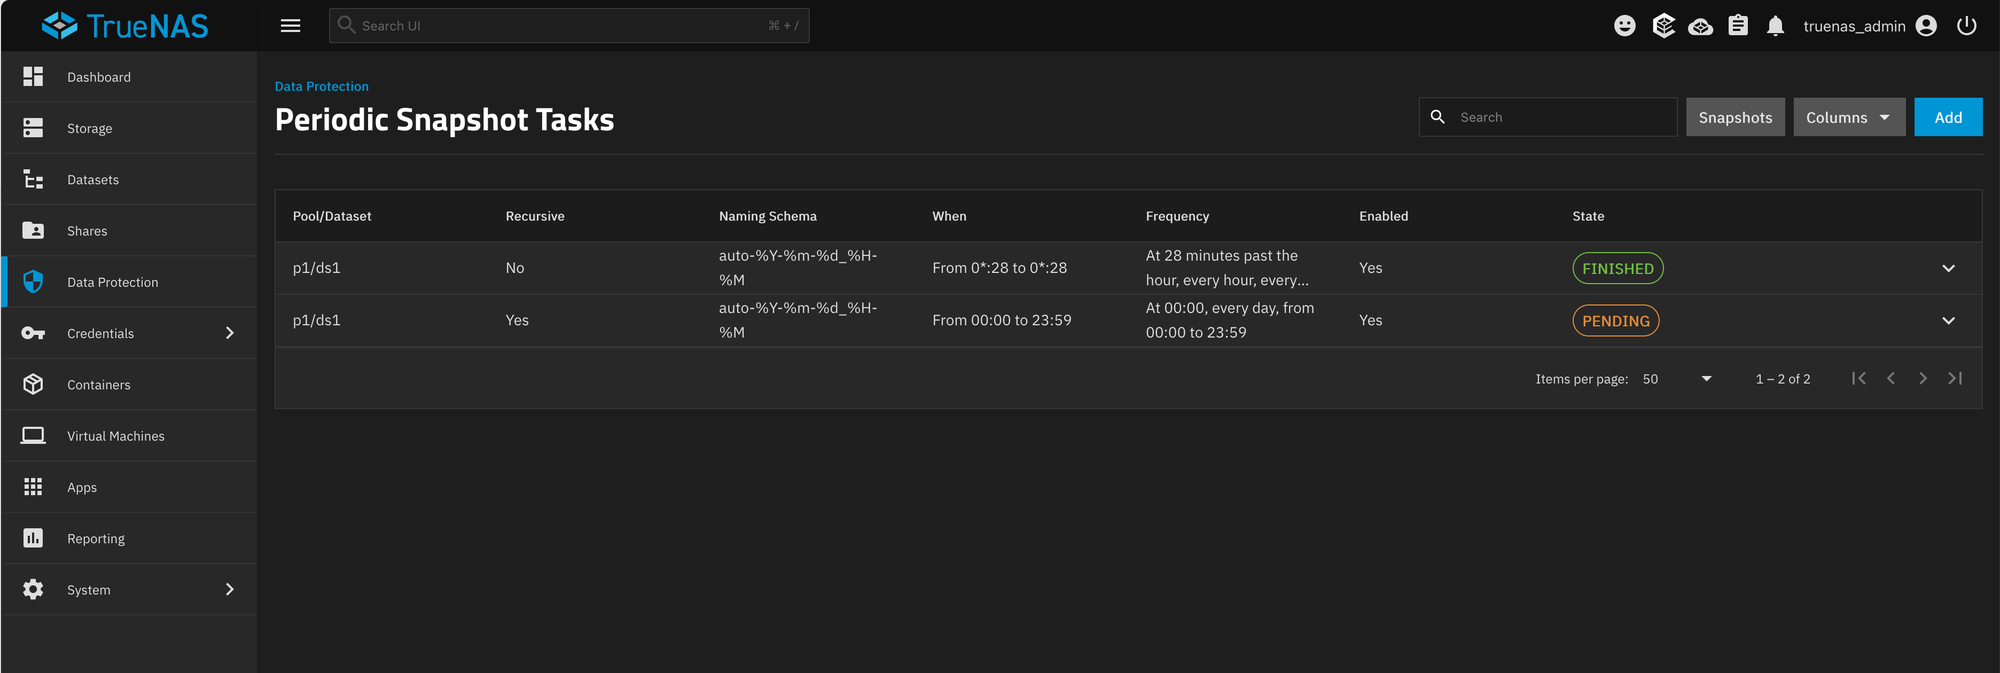
This creates a useful hierarchy with hourly snapshots retained for 14 days and
daily snapshots retained for six months. For important datasets, monthly snapshots might be retained for several years (Figure 5).
Snapshots can also integrate with SMB shadow copies. Windows users can then right-click a file or directory and access previous versions without asking an administrator to perform a restore.
Keep in mind, though, that snapshots are not backups; if the server is stolen, destroyed by fire, or suffers catastrophic pool corruption, snapshots located on that same pool disappear with it. For genuinely important data, keep at least one copy at another physical location (e.g., using the replication feature described next).
Replication
TrueNAS combines snapshots with ZFS replication. Replication sends snapshots to another ZFS dataset, either locally or on another system. After the initial transfer, later replications are incremental and therefore transmit only the changed data.
A useful architecture looks like this:
Primary TrueNAS
192.168.1.10
      |
      | SSH + ZFS replication
      |
      v
Backup TrueNAS
192.168.20.10
Create periodic snapshots on the source and configure a replication task to the backup system. The first replication transfers all selected data and may take hours or days. Subsequent replications are normally much smaller.
A second TrueNAS system does not need identical hardware. A powerful primary server could replicate to a slower machine with large inexpensive disks, because backup workloads often care more about capacity than performance. A second TrueNAS server at another office or family member's house can be a very effective backup target if the connection is protected with VPN or a carefully restricted SSH configuration.
Scrubs and Data Integrity
ZFS stores checksums for data and metadata. When a block is read, its checksum can be verified. With redundant storage, ZFS can often detect a corrupted block and reconstruct the correct version from another disk.
But data that is never read would otherwise not be checked regularly. That is where a scrub comes in. A ZFS scrub walks through stored data, verifies checksums, and repairs recoverable errors. TrueNAS can schedule scrubs automatically. A monthly scrub is a reasonable starting point for many systems, although the appropriate interval depends on pool size and workload.
A scrub may take many hours on a large pool. The command zpool status might show:
scan: scrub in progress
      12.4T scanned
      8.1T issued
      0B repaired
Scrubs generate substantial disk I/O. Schedule them for periods where lower application performance is acceptable (e.g., at night).
TrueNAS also integrates disk-health monitoring. Self-Monitoring, Analysis, and Reporting Technology (S.M.A.R.T.) data can reveal failing sectors, read errors, and other drive-health information. Neither S.M.A.R.T. nor ZFS can predict every drive failure, however. Configure alerting so that failed disks or degraded pools are noticed immediately rather than three months later when a second drive fails.
Replacing a Failed Disk
Eventually, during the lifetime of your NAS, a disk will fail. That is not necessarily an emergency if the pool was designed with sufficient redundancy. Suppose a RAIDZ2 pool reports one failed drive. The pool becomes degraded but remains operational.
First identify the physical disk correctly: TrueNAS displays model and serial information in the disk list. On hardware with enclosure management, drive-location LEDs can make identification easier.
Offline the failed disk if necessary, replace it physically, and tell TrueNAS to replace the failed device with the new one. ZFS then begins a resilver: During resilvering, the system reconstructs the required data onto the replacement disk. Depending on pool size, disk speed, and active workload, this can take a long time. You can monitor progress under the storage interface or with zpool status.
Keeping one compatible spare disk on-site for quick replacement is often worthwhile, particularly when the installed drives are large or unusual enough that a replacement might take several days to obtain.
Encryption
TrueNAS supports encrypting ZFS datasets. Encryption is particularly useful when the threat model includes stolen disks or decommissioned hardware. Without the encryption key, someone removing the drives would not be able to read the encrypted datasets.
Encryption can be configured at dataset creation time. Child datasets can inherit encryption from their parent or use separate keys depending on the desired design.
Before enabling encryption, decide how keys will be backed up as you will not be able to recover from a lost key otherwise. Store recovery keys somewhere independent (e.g., in a password manager, an offline encrypted USB storage device, the company's secrets vault, or in a physical secure storage). And ideally, keep more than one protected copy.
Dataset encryption protects data at rest. It does not protect files from an attacker who logs in through SMB with a legitimate user's credentials while the dataset is unlocked. For ransomware protection, snapshots, restricted permissions, and off-system backups remain necessary.
Applications
Modern TrueNAS Community Edition is more than a file server. It can also run applications directly on the storage system. The Apps interface provides a catalog of packaged applications and allows administrators to deploy services close to their data (e.g., a PostgreSQL database, Nextcloud file sharing, or a Plex media manager).
Before using Apps, select a storage pool for application data. TrueNAS maintains application infrastructure on that pool and allows datasets to be mounted into individual applications.
The more services that run directly on the NAS, the more the storage system becomes a general-purpose application server. An application using excessive memory or CPU now competes with ZFS. A compromised container runs on the same physical host that stores the organization's data. Application updates also become part of the NAS maintenance process.
For a small home environment, combining these roles may be reasonable, but for business-critical storage, separating storage and compute often produces a cleaner architecture where the NAS then performs one job and one job only.
Containers and VMs
TrueNAS Community Edition also supports virtualization functionality. VMs receive virtual CPUs, dedicated memory, and virtual disks backed by ZFS zvols. A VM can therefore run Windows, Linux, or another operating system directly on the NAS host.
This is useful for light auxiliary services, testing, or a small homelab. As with applications, however, resources used by VMs are no longer available to storage workloads. Allocating 24GB of a 32GB NAS to VMs leaves much less memory available for ZFS caching. A dedicated hypervisor such as Proxmox, VMware, or Hyper-V is usually a better choice when virtualization is the primary workload.
Backups to Cloud Storage
ZFS replication is excellent when another ZFS system is available, but TrueNAS also supports cloud-oriented data-protection tasks.
For especially important data, this can form the third copy in a 3-2-1 backup strategy:
- Production data on TrueNAS
- Replicated copy on a second TrueNAS
- Off-site copy in object storage
Cloud storage is particularly useful against site-wide disasters, but you need to keep in mind what your recovery targets are, because a 20TB backup that takes days to download is not necessarily appropriate for data that must be restored within four hours. Classify the backed-up data first: Critical business documents may warrant an additional cloud copy while replaceable media files may not. The correct backup design follows recovery requirements rather than whichever backup destination is easiest to configure.
Configuration Backups
One small but very important TrueNAS feature is configuration backup. TrueNAS stores system configuration separately from the actual ZFS data. Export the configuration after important administrative changes so that recovery after a boot SSD failure is as simple as these four steps:
- Replace the failed boot device.
- Install the same or compatible TrueNAS version.
- Upload the saved configuration.
- Import the existing ZFS pool.
The data pool itself does not depend on the original boot disk. Configuration backups are tiny compared to the data stored on the NAS, so there is little reason not to keep several copies.
Security
A storage server contains a concentrated collection of valuable data so compromising it is considerably more useful to an attacker than compromising an ordinary workstation.
The web administration interface should therefore never be exposed directly to the public Internet. Administrative access should come from a trusted internal network, a management VLAN, a VPN, or an appropriately protected administrative jump host.
Use HTTPS for the management interface and replace default or temporary certificates where appropriate.
Create individual administrator accounts rather than sharing one root-style password. Use the least amount of privilege necessary and enable multifactor authentication when supported by the authentication setup.
SMB and NFS permissions deserve the same attention. A ransomware infection on a workstation can encrypt every file that workstation is allowed to modify. ZFS itself cannot distinguish malicious file modifications from legitimate ones.
Snapshots provide a valuable second line of defense, particularly when ordinary users cannot delete them. Remote replication provides another.
For sensitive deployments, consider keeping replicated backups inaccessible using the same credentials as the primary environment. Otherwise, an attacker who compromises the primary administrative account may also be able to destroy the backups.
Disk encryption protects drives that are physically stolen, but it does little against an attacker who compromises a running and unlocked NAS.
Keep TrueNAS updated, limit installed applications, disable services you do not use, and avoid turning the NAS into a convenient dumping ground for unrelated workloads.
The simpler the storage server, the smaller its attack surface tends to be.
Review & Outlook
With OpenZFS at its core, TrueNAS provides a storage foundation with checksumming, redundancy, snapshots, compression, and replication, while the TrueNAS management interface makes those capabilities accessible without requiring administrators to build an entire storage platform manually.
For homelabs and small organizations, it can turn commodity server hardware into a very capable NAS. At the other end of the spectrum, the same fundamental technologies can support much larger storage systems with fast networking, dozens of disks, and replicated datasets.
ZFS makes it easy to build reliable storage, but it does not eliminate the need to understand vdev layouts, redundancy, capacity planning, and backups. An incorrectly designed ZFS pool remains incorrectly designed no matter how polished the web interface is. That's why administrators should make sure to understand the implications of all their decisions when setting up the NAS.
TrueNAS is at its best when storage remains its primary job. Give ZFS direct access to reliable disks, choose redundancy based on the importance of the data, organize datasets deliberately, schedule snapshots, replicate important data elsewhere, and monitor the hardware. With those foundations in place, TrueNAS Community Edition provides a remarkably capable storage platform without requiring a proprietary NAS appliance.
This article was made possible by support from Hetzner through Linux New Media’s Topic Subsidy Program.
Learn more about self-hosting on Hetzner infrastructure.